Server IP settings.

IP 192.168.0.70
SUBNET 255.255.255.0
nmcontrolled no
onboot yes
DNS1=192.168.0.1

Yum install system-config-kickstart
# Install the kickstart package.

system-config-kickstart
# run the kickstart utility.

In the second last option you can remove text mode installation option and opt
For a graphical one.

Select the http installation method

Use the defaults.

In the disk label option choose the first option (Initialize the disk label).
The partitions that I have created are like this.

Mount Point            type         size
/boot         ext4         500
 swap         swap         2048
  /                     ext4         18000
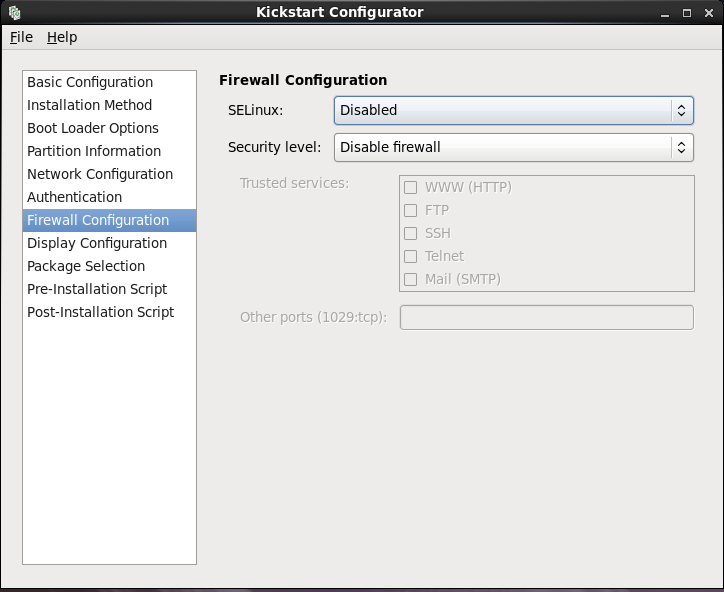
Make sure that SELinux option is disabled and
Security level is set to Disable firewall.

Save the ks.cfg file to the filesystem.
Yum install –y syslinux xinetd tftp-server dhcp httpd
# Install all the required packages through yum

mkdir /var/lib/tftpboot/pxelinux.cfg
cp  /usr/share/syslinux/pxelinux.0  /var/lib/tftpboot/

vi /etc/xinetd.d/tftp
# Open the xinetd settings to enable tftp server.
# at line 14 set the parameter to no from yes.
Disable=no
service xinetd restart
# Restart the service to apply the settings made.

chkconfig xinetd on
# set the service to start with each subsequent system reboots.


vi /etc/dhcp/dhcpd.conf
# Open the file and configure the DHCP Server.


# Global Options
Allow booting;
Allow bootp;
authoritative;

# Subnet definition
subnet 192.168.0.0 netmask 255.255.255.0 {
# Parameters for the local subnet
option routers               192.168.0.1;
option subnet-mask           255.255.255.0;
option domain-name           “example.com”;
option domain-name-servers   192.168.0.1;
default-lease-time           21600;
max-lease-time               43200;
# Client IP range
range dynamic-bootp 192.168.0.100 192.168.0.200;
filename  “pxelinux.0”;
next-server  192.168.0.70;
}

# Here the next–sever parameter is the address of the kickstart server.

service dhcpd restart
Chkconfig dhcpd on

# restart the service and make it permanent.

mkdir –p /var/pxe/rhel6
mkdir /var/lib/tftpboot/rhel6
# make some required directories.

Insert your RHEL 6 dvd

mount  /dev/cdrom   /mnt
# Mount it to /mnt

ls –l /mnt
# Check the contents to see if it is properly mounted.

cp –ivr /mnt/*  /var/pxe/rhel6
# copy all the contents to the /var/pxe/rhel6 directory.

umount /mnt
eject
# after the file copy operation unmount and eject the dvd.

cp  /var/pxe/rhel6/images/pxeboot/vmlinuz   /var/lib/tftpboot/rhel6
cp  /var/pxe/rhel6/images/pxeboot/initrd.img   /var/lib/tftpboot/rhel6
# copy the vmlinuz and initrd.img files to the tftpboot directory.

cp /usr/share/syslinux/menu.c32  /var/lib/tftpboot/
# copy the menu file.

vi /var/lib/tftpboot/pxelinux.cfg/default

timeout 100
default menu.c32

menu title $$$$$$Boot Menu$$$$$$
label 1
  menu label ^ 1) RHEL6
  kernel rhel6/vmlinuz
  append initrd=rhel6/initrd.img  ks=http://192.168.0.70/ks/ks.cfg  ksdevice=eth0

# Prepare the boot menu.
chkconfig httpd on vi /etc/httpd/conf.d/pxeboot.conf # create new entry Alias /rhel6 /var/pxe/rhel6Options Indexes FollowSymLinks Order Deny,Allow Deny from all Allow from 127.0.0.1 192.168.0.0/24 # Ip address you allow service httpd restart (ignore the domain name error if it occurs.) # Prepare the httpd server mkdir /var/www/html/ks cp /ks.cfg /var/www/html/ks/ks.cfg chmod 644 /var/www/html/ks/ks.cfg # make the directory and copy the kickstart file to it. # and make the kickstart file globally read only.
The pxe server is ready.

Plug a computer into the network and boot it through LAN using pxe.

The client pc should  have a display as below.

MAN!!! u people are awesome was searching for some easy method for configuring PXE boot on RHEL 6. wat so ever i got before this was hell confusing but you gave me easy n interactive method..... thankx a ton n hats off to u...
ReplyDeleteAwesome .. short and sweet ... A perfect quick start guide for PXE deployment
ReplyDeleteI followed the above procedure to configure on my RHEL6.2 Machine. I am unable to boot through PXE.
DeleteIts giving error:
PXE-E18: Server Response timeout
What should i do? Please reply
I think that you are booting through a client which is using UEFI (Unified Extensible Firmware Interface) instead of BIOS interface.
DeleteFrom Wikipedia - "The Unified Extensible Firmware Interface (UEFI) is a specification that defines a software interface between an operating system and platform firmware. UEFI is meant as a replacement for the BIOS firmware interface."
If you can give me the Client and Server Model/Make details i may be able to help you out.
Anonymous, the above assumes you didn't need to add any firewall rules to allow access to the BOOTP server on the system that is hosting it.
DeleteMake sure you have an entry in iptables to allow inbound traffic via port 67/udp ("iptables --list", in case you're trying to recall the command).
-GreenieMeanie
hey bro why have you stopped adding rhel 6 tuts??? please add more tuts
ReplyDeleteAwesome.......A perfect quick start guide for PXE deployment.
ReplyDeleteHi..
ReplyDeleteI getting "TFTP open timeout" error
Did you specify the "next-server 192.168.0.70;" option while configuring the dhcpd.conf file?
DeleteIf it is REDHAT 6 pls disable iptables and try.-pavan
Deletehi friends please anyone help that dhcp configuration step... first am i want copy sample file from /usr/share/doc/dhcp-4.1.1/dhcpd.conf.sample? .... after copy file when i edit it global option not available...pls
ReplyDeleteI would like to add a comment in the above config as i faced a issue while installing with the above procedure.
ReplyDeletevi /etc/httpd/conf.d/pxeboot.conf
Alias /rhel6 /var/pxe/rhel6
Options Indexes FollowSymLinks
#Order Deny,Allow
#Deny from all
Allow from 127.0.0.1 192.168.0.0/24
Simply awesome! Nothing else to say!!! :)
ReplyDeleteThank you a lot .........
ReplyDeleteMy linux teacher is a dumbass this helps me a lot....
ReplyDeleteIf you copy and paste directly form this tutorial, you may get unexpected results and different types of double quotes are used that Linux may not expect. Also 99% of commands start with lower case so if some of them fail while you follow along, you know why. This is done for proper sentence structure in the tutorial. GREAT tutorial! Just a heads up to any new Linux users out there.
ReplyDeleteHats off to you Sir....
ReplyDeletehi I have done all step but I m restart the httpd service that time syntax error showing with /etc/httpd/conf.d/pxeboot.conf allow not allowed here.
ReplyDeletehi..i am getting error
ReplyDeleteuable to retrieve http://ip/rhel6/images/install.img
please help.
Mushfiq.
If you follow the instructions as listed above using any version of RHEL with selinux in enforcing mode, you'll have this problem.
DeleteYou will need either to label the /var/pxe/rhel6 directory to allow Apache to serve .img files, or disable selinux.
-Greenie Meanie
Thanks a lot!
ReplyDeletePlease note that there is a little correction required to the HTTP "Alias" section. It is missing the "Directory" directive. The functional code is as follows:
Alias /rhel6 /var/pxe/rhel6
Options Indexes FollowSymLinks
Order Deny,Allow
Deny from all
Allow from 127.0.0.1 192.168.0.0/24
Thanks a lot!
ReplyDeleteyou are a gem and you made my day. Never stop doing these things mate. Thanks a lot
ReplyDeleteHi All, I have followed all the steps above but when I restart the httpd service I get a syntax error saying: /etc/httpd/conf.d/pxeboot.conf allow not allowed here.
ReplyDeleteJust Solved the issue where there's a syntax error saying: /etc/httpd/conf.d/pxeboot.conf allow not allowed here. Here's the solution:
ReplyDeletevi /etc/httpd/conf.d/pxeboot.conf
# create new entry
Alias /rhel6 /var/pxe/rhel6
options Indexes FollowSymLinks
order deny,allow
deny from all
allow from 127.0.0.1 192.168.0.0/24
# Ip address you allow
It will give you an error about the Servername but httpd will start.
Hi,
ReplyDeleteIt worked like a charm at the first shot.
Cheers,
Ram
Hello All, I followed above mentioned steps but still I am getting error like below.
ReplyDeleteroot@Server2 ~]# service httpd restart
Stopping httpd: [FAILED]
Starting httpd: Syntax error on line 4 of /etc/httpd/conf.d/pxeboot.conf:
order not allowed here
[FAILED]
[root@Server2 ~]#
I have done settings like same in pxeboot.conf
Alias /rhel6 /var/pxe/rhel6/
options Indexes FollowSymLinks
order deny ,allow
deny from all
allow from 127.0.0.1 192.168.0.0/24
but still getting error. Please let me know how can I figure it out?
Is worked for me thank you very much
ReplyDelete